Sing Along Retro TV Lyric Video Effect in Premiere Pro
Music videos are certainly not a thing of the past and neither are the lyric effects that we see within videos everyday. When you break down what it takes to create lyric effects, you’ll find that the process can actually be more simple and contain fewer steps than we initially perceive. In today’s blog, we will take a brief look at the Retro TV Music Video Lyric effect as seen in Sia’s “Cheap Thrills” lyric video.

We will explore creating a tv lens, adding effects which can create distortion, an aged look, modified color, and also animation. When combined, your end result is a very nice set of lyrics that can be used for your music video or other projects.
Starting the Process
To begin the process, go to Create New item > color matte (choose black) and then drag the matte into the timeline on top of your video footage. A very easy way to create a mask is by importing a screenshot and then dragging the screenshot into the sequence; on top of your video layer.
Go to effect controls and use the mask pen tool to trace a mask around your desired object, in this case it’s a tv screen
Pro tip * Use the mask handles to adjust the mask to fit the tv screen.

After the mask is created, delete the screenshot layer and then go back to your matte layer. Click the invert option to invert the mask, so you can see your video footage within the mask. You can adjust the feathering if you want to give a smoother line.
For organization purposes you can right click on color matte Layer and rename it as TV Mask.
Bring on the Effects
To achieve the desired effects, start by going to the Program layer and creating a new adjustment layer. Drag the adjustment layer into the sequence and place it on top of the tv mask.
With the adjustment layer selected, go to the top menu and select Window > Lumetri Color. From creative drop down, select Monochrome Kodak 5205 Fuji 3510; this will provide an excellent monochromatic look to your video

To add a blur, go to effects and search for Gaussian blur. Drag the effect onto the video adjustment layer. From the effect controls panel, you can adjust the blur level. Again for organization purposes, right click on the adjustment layer and label it as B&W + Blur (black and white plus blur).
Adding Noise to the footage
To add noise, add another adjustment layer into the sequence. Note that this layer should be below the tv mask layer. From Effects, search and select the noise effect, which is located under the noise and grain folder. Drag and drop the effect onto the noise layer. You can adjust how much noise you have within effect controls.

If you’re interested in adding film distortion, you can download film distortion overlays from sites such as Storyblocks. Simply download and import to begin experimenting with blend modes. Using distortion overlays can enhance your footage if you’re looking for cool overlays or a damaged film look.
After your noise effect Is applied, it typically requires rendering. In this particular project we still have lyrics to create, so for now you can turn off the effect and then turn it back on once you’re ready to render.
Let’s Get Lyrical!
To create lyrics, click on the type tool and then click on the program window to begin typing your lyrics. Use any font that works with your stylistic choices. You can use the position tools to adjust the placement of your lyrics.
Pro tip: Placing the text layer below your adjustment effects layers will apply the effects to your text as well.

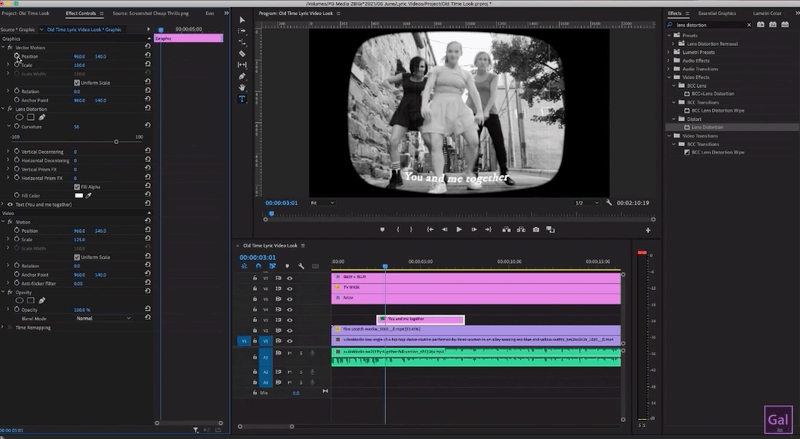
Lens Distortion & Text Animation
To add curvature to the text, search effects for Lens Distortion and then drag & drop this effect onto the text layer in the timeline. In effect controls, you can adjust the curvature to help the text have a more natural curve.
Note: The text size will be affected during curvature adjustments so you may need to make adjustments by scaling the size of text.
To animate your lyrics, turn on the position stopwatch to create your first keyframe. Place the playhead at the beginning of the text clip and then move the text off screen by using position control. Be sure that the text is below the tv mask. When the text is positioned as desired, your next keyframe should be in place.
Next we will have the text animate up and disappear. To achieve this, create a new mask above the text. Invert the mask, and then add keyframes in the same process as the previous text animation. Begin with a keyframe placed where you want the animation to start and then use the vertical position tool to push the text up behind the new mask. As a result, the text can now disappear.

Next we will have the text animate up and disappear. To achieve this, create a new mask above the text. Invert the mask, and then add keyframes in the same process as the previous text animation. Begin with a keyframe placed where you want the animation to start and then use the vertical position tool to push the text up behind the new mask. As a result, the text can now disappear.

Duplicating your text layer
To duplicate the text layer, hold down the option key or Alt key if using PC while simultaneously clicking and dragging the text layer up one layer; this action will duplicate the text layer. You can stagger the layers so the text appears with roll up replacement style. In each duplicated text layer, you would replace the text in the essential graphics panel and adjust the timing of each lyric by pulling the ends of the respective text layer.

When ready, turn the noise effect back on for the noise layer and render your video.
After all steps are completed, you will have a wonderful finished project with excellent lyrics. Remember that these lyrics can be used for many projects in addition to music videos. Also, don’t be afraid to experiment with settings when applying effects. More often than not, we focus on adding the effect and we don’t experiment within the many options or settings available for a particular effect. In taking advantage of effects and their settings, the end result can be very impressive.
Find that you don’t have lots of time to go through many steps? Interested in having a lyric template for immediate use? Become a Patreon member or buy the lyric video template from Gal’s store. As always, keep creating better video with Gal.