How to Create Eye-Catching Text for Lyric Videos
In this tutorial, you will learn how place outline lyrical text behind exploding objects as seen in the Kid Laroi and Justin Bieber’s lyric video for “Stay.” Since we can’t use the song “Stay” due to copyright we will be using an alternative track called “Gave it All We Got” by Tommy Ljungberg from Epidemic Sound. But, of course, you can use any music you like! As for the footage, we will use the exact same footage from Kid Laroi’s music video because we found the same footage in the Envato Elements library.
Envato Elements is the sponsor of this tutorial. By signing up for an Elements subscribe you can download unlimited stock footage, add-ons, transitions, templates, sfx, music and more. And you can use the assets in any type of video, commercial to youtube monetized content. Using our link you can get 70% off your first month and download as much as you need to start creating videos faster.
Now let’s get into business and learn how to make a lyric music video using both Premiere Pro and After Effects. You’ll find a timecode next to each heading below if you’d like to watch how it is done in the video tutorial.
Creating a Film Matte (2:19)
The first thing to notice is that round corner for the videos to imitate the 60’s TV effect, which is a film matte overlay. Achieving this look is simple, it requires two steps in Premiere Pro:
Download the Film Matte template
Since the film matte template is a PNG (a type of image file), drag and drop to your timeline on top of your footage. (If your footage is on video layer 1, then you’d place the Film Matte on video layer 2). This will give you a rounded corner film look.

Create Filmic Look to the Footage (3:09)
After the filmic look is done, now we are moving on to “Color-Grading” to give it a filmic vintage look to our footage for the right vibe!!
Create an Adjustment Layer and place it below the Film Matte so we can create a Filmic Look to the footage.
You can tweak the color using Lumetri Color’s basic corrections or to get the color you want or you can apply Premiere’s Preset
Or you can get the plug-in Film Convert into your Premiere because Film Convert provides real film simulation for footages (10%off Code: PremiereGal)
To apply Film Convert: go to Effect, then type in FilmConvert. Then drag and Drop to the Adjustment Layer we just created specifically for the Filmic Look we are trying to achieve.
Gal chose Polaroid 600 Film Stock as the Simulation.
You can tweak for the intensity of the simulations under the Effect window for it.
(Once you’re done tweaking, click on the fx icon from the effect controls to turn the effects on or off).

Create Filmic Transition Between Cuts (4:31)
To make the filmic look perfect, we need some vintage transitions too so here’s how:
To add a bit more accent to the video, we can add in some light leak transition between cuts as well
Download this Light Leak Package from Envato Elements
The light leak transitions are video files so you can drag & drop the light leak footage on top of the main footage between cuts to add that transitions.
Since the light leak videos were shot on a black backdrop, to see the video beneath go to the Effect Controls panel and switch the Blend Mode to “Screen” to eliminate the blacks in the video.
Creating Text (5:21)
After the basic visual is set, we are moving to the main ingredients for our video today and that is, the text! With text, we are moving into After Effects for a better process. This is why we will export the file from Premiere and import it into After Effects. After Effects has a built-in Typewriter Effect and a rotobrush tool that will make rotoscoping so much easier. First the text:
Import video into After Effects, then right click the video and select “Create New Comp”.
For the first text, you can type out your first line or in our case we will first type out the song’s title & the artist’s name.
Click on the Type Tool and click on the comp window to start typing. We used the font called Aktiv Grotesk Ex

Create Outline Text in After Effects (7:03)
We typed out the text and now we need to change into outline-text before we are animation. To make text stroke-only, click on the small stroke box (next to the color fill box from the Character panel) and change it to your desired color. Just below, we can then adjust the stroke width, we will set ours at a width of 3. Right next to stroke box, also click the color Fill Box (with the little red dash inside) this will remove the fill color entirely and now it will be stroke only.
Typewriter Animation (8:07)
Now to the heart of the whole tutorial - Animation! It’s a bit more complicated, but the steps are very intuitive, if the steps below aren’t exactly communicating to you please feel free to click on the timecode on next to the section heading above and watch how it is done.
Select the text layer you want to add the animation to (in this tutorial, Gal first started with the title of the music track “Gave it All We Got”)
Go to Effects & Presets and search Typewriter, double click it to apply it to your selected layer.
Press Spacebar to play (& render).
Toggle open the Text layer to go the controls. Open “Text” -> Animator 1 -> Range Selector 1.
Once you open Range Selector 1, it has automatically set the Start Point and End Point for the Typewriter Effect.
You can move the End Point to prolong the Typewriter Effect (so it runs slower), or vice versa by pulling the End Point closer to Start Point to speed up the Typewriter Effect.
Repeat for every text layer.
If you want to cut a text layer at a specific frame, press the ALT key (PC) or OPTION key (Mac) and press the left [ or right ] bracket key.
To move frame by frame in After Effects, press CTRL on a PC or CMD on an Apple and use the Left or Right arrow keys to move left or right.
It looks overwhelming on text here, but once you actually do it on your own I promise it’s actually quite intuitive as you follow along!
Rotoscoping Footage (10:00)
Rotoscoping is when use can cut out moving objects in your video so they have a transparency layer behind them. It’s essentially like making a super easy mask around the subject. Then you can place objects or text behind or on top of the rotoscoped objects. How does it work?
First, we need to duplicate the footage layer. The shortcut for it is CMD+D(Mac) or CTRL+D(PC)
For organization, rename the duplicated layer to “Clock Roto” because we will be rotoscoping a moving clock. But rename it something that makes sense to your edit. (To rename, select the layer name and press Enter)
Now we need to trim the exact portion of the duplicated layer that we want to rotoscope. To make sure the clip starts at specific frame, press ALT (PC)/ OPT (MAC) + [. And to make sure the clip ends at this exact Frame = Alt (PC)/ OPT (MAC) + ]
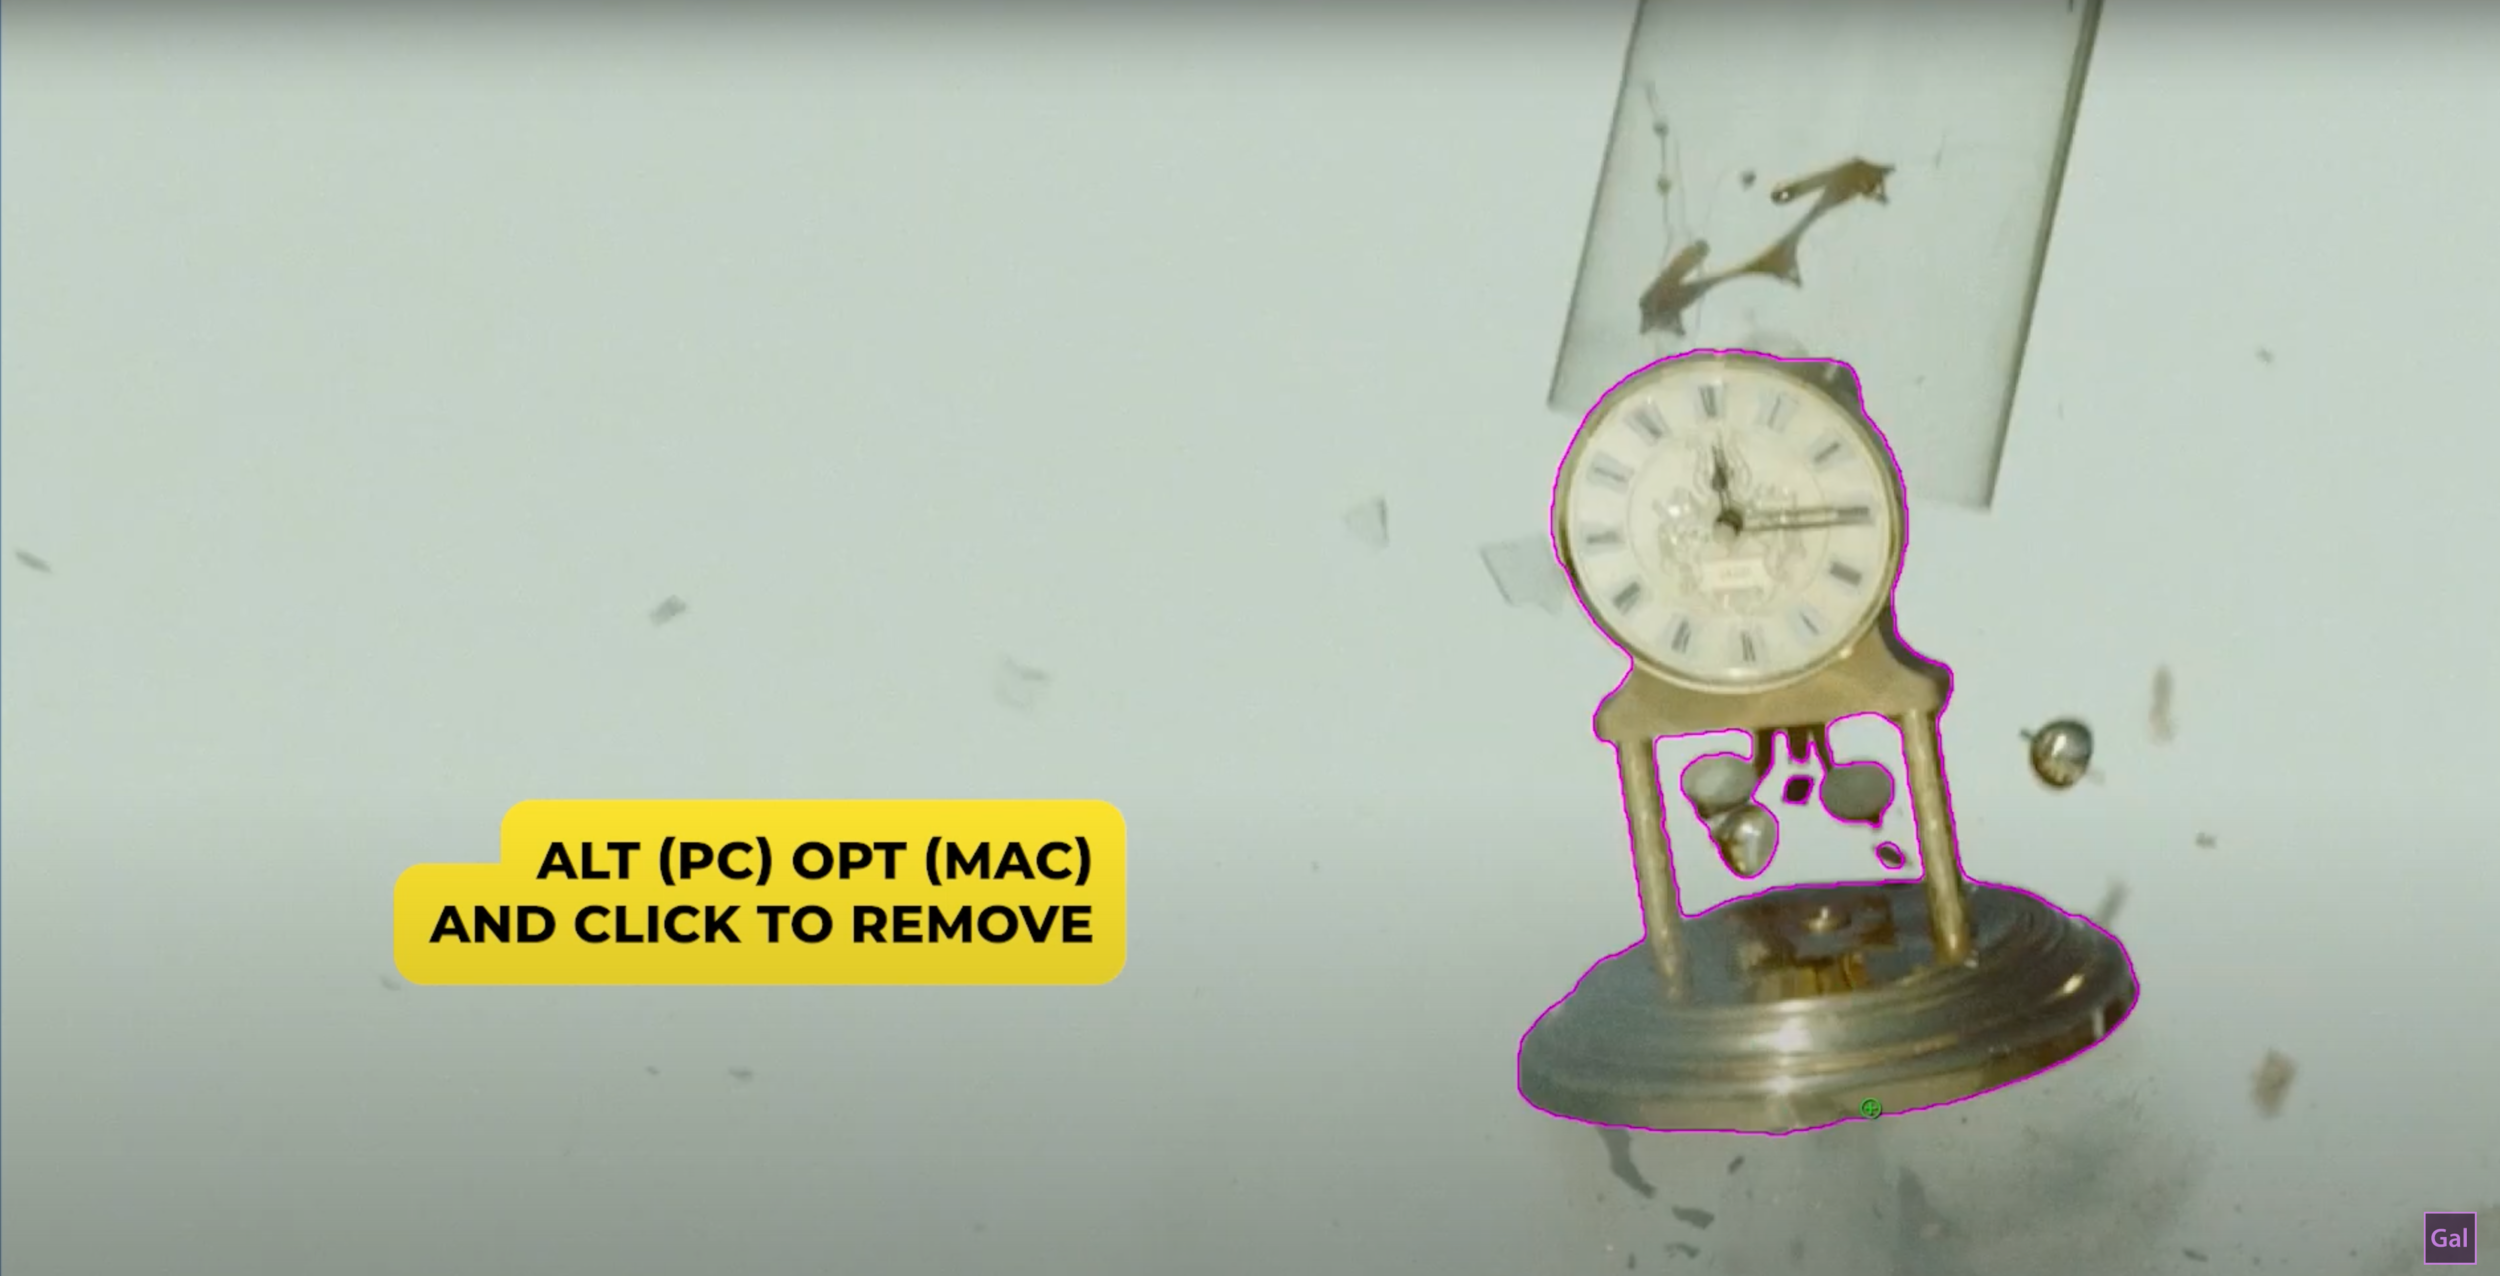
Select the Rotobrush tool & then click to select the object you want to roto. To remove an unwanted area press the ALT (PC)/ OPT (MAC) & click to remove.
After selecting the object, press “Spacebar” to play the footage so After Effects can start tracking & rendering for the object’s movement frame by frame.
Bring this Rotoscope Layer below the actual Footage, now your text goes behind the exploding clock.

Export (13:11)
To export the whole video go to File > Export > Add to Render Queue. Change the video’s output location to a place on your drive.
Then hit render. And VIOLA!!!

We hope you now feel more comfortable applying cool rotoscope text effects to your very own videos. If you have any questions feel free to use the comment section below or tweet @Premiere_Gal on Twitter. And if you'd like to learn some more awesome effects and editing tricks, be sure to subscribe to Premiere Gal's YouTube channel.