Match Any Camera in Premiere Pro
Cinematch is a new camera-matching solution for editors, colorists, DITS, and cinematographers. You can transform a Sony camera into a Red, or a Canon into Fuji, or vice versa.
First in this video, you'll learn about the best practices for shooting to match, such as camera profiles (c-log and s-log), white balance, settings, etc.
Then, in Premiere Pro, you'll learn how to setup a multi-camera source sequence with a Sony & Canon camera. You'll learn how to turn on comparison view and apply effects at the Master clip level. You'll learn how to set the source and target camera settings and apply some secondary control effects with Lumetri scopes.
Before getting started, we’re going to go over some basic camera setting rules
Rule # 1 : Shoot in LOG or RAW format
Cinematch works best when you shoot in a LOG or RAW format as it provides the plugin with a higher quality of color information to work with.
Rule #2 Adjust White balance from Auto to Custom White Balance
Setting your custom white balance will also provide Cinematch with more accurate color temperature information when matching. Follow your camera’s manual to set a custom white balance and don’t forget to use a white card or simple white sheet of paper to help you achieve the most accurate white balance.

On the Canon EOS R you first need to take a photo of someone holding a white card. Then from the camera menu settings (4), select “Custom White Balance.” And choose the most recent photo you took of the white card.
Rule #3 Keep Consistent Shooting Settings on All Cameras
When using multiple camera models on the same shoot , you want to make sure they all are all set to the same Shutter Speed, Aperture (F Number), and ISO settings.

Image from SLR Lounge.
Now that we’ve covered our bases, you can visit the Youtube video description to download prepackaged footage to follow along with the PremiereGal Youtube tutorial.
Step-by-Step
Step 1: Create Multicam Sequence
To do this we will hold shift and select all clips in the project pane you want to be in the multi camera sequence; followed by control+click and selecting “Create Multi Camera Source Sequence”, then hit OK.
After processing, you will see that all clips have been put into a Processed Clips folder. If you click on the folder, you’ll see the last item is the Multicam sequence.

As you scrub through the timeline you’ll notice that only one camera is seen in your program panel. To see both cameras; you’ll want to enable the Toggle Multi Camera View icon. If it is not sitting in your saved tools below your Program panel; you can click the Button Editor on the right and drag over the Toggle Multi Camera View tool. It should appear blue as that indicates you have the button enabled; if not, click it. Now you should see both camera angles in your program panel.
Now to switch between the two camera angles, you will use the Number Keys on your keyboard. For example in this tutorial, 1 is the Canon, 2 is the Sony.

To edit in real time, hit play and then press the number for the camera you want to focus on. If you hit spacebar to pause, you will observe that a cut has been made.
Next we’re going to get out of Multi-camera View by unselecting the Toggle Multi Camera Tool and selecting the Comparison view tool to the left. Comparison view is going to help us achieve excellent color correction of two different shots.
Step 2: Color Correction with Cinematch
Instead of searching for Cinematch in the Effects panel, we’re going to apply Cinematch to the master clip and work on the master level.
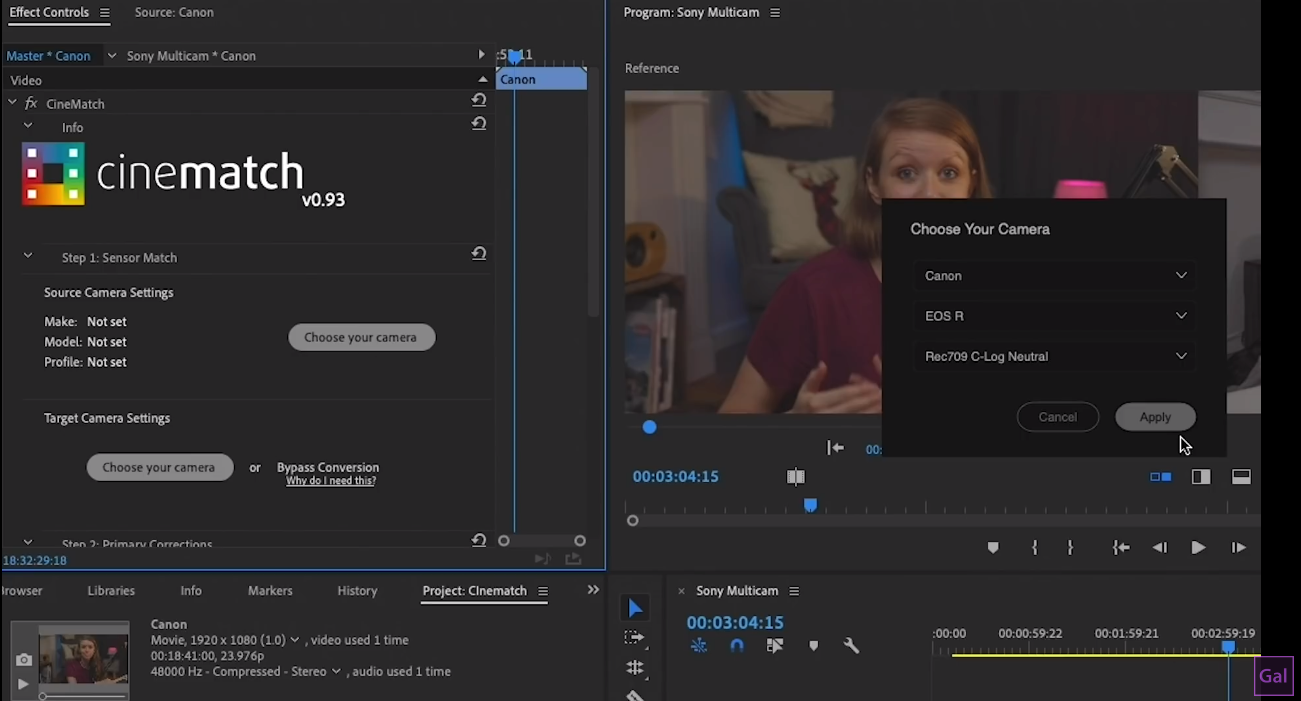
To do this, we’re going to go to the Processed Clips bin and select the camera, in this case “Canon” and then drag Cinematch onto the Source Panel.
Next we will open Effects Controls (upper left above source panel) and make adjustments to Cinematch. We will then change the Source Camera Settings by clicking: Change Your Camera , then Select Your Camera, then choose appropriate Log Settings. Then apply. As you see, nothing occurs because we told Cinematch what kind of camera we’re working with. If you scroll down to Primary Corrections and click Apply Rec 709 Transform, you will see that the image brightens.
And now you’ll repeat the exact same process for the other camera.We will click the second camera under processed clips, drag Cinematch to the source panel. Go to Effects panel and change the camera settings, apply Rec 709 to brighten.
Step 3: Primary Corrections
If we scroll down to Primary Corrections we will see a Display False Color Control. We can click Exposure Middle Gray to see the exposures of middle gray to compare exposure levels. You can also do the same for the other camera as well. You can use the green areas to compare exposure levels in each camera and make adjustments using the exposure slider.
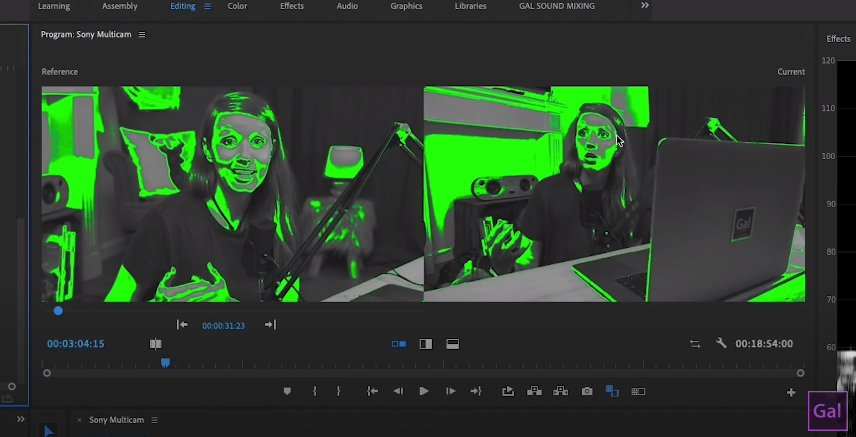
We can also turn off middle gray and then click skintones to see skintone maps, compare and make adjustments to match the orange areas with the exposure sliders.

Step 4: Secondary Corrections
If you’d like to get more contrast, use Secondary Corrections controls, by scrolling down past the Primary Corrections. Use the luma curve on the left and adjust as needed.

Check out that amazing Cinematch quality!! Here’s Before, followed by After!

BEFORE (CANON EOS R ON LEFT, SONY RX100 ON RIGHT)

AFTER (CANON EOS R ON LEFT, SONY RX100 ON RIGHT)