How to Export Video to Vimeo in Premiere Pro CC 2017


Just like YouTube, Vimeo’s player will also add black pillar bars to the left and right of 480p (4:3) video. Premiere Pro’s exports settings for Vimeo are almost identical to YouTube, except there is not a Vimeo Preset for 4k video yet. To get started, go ahead and select the "Vimeo 1080p HD" preset.

Once the preset is set, scroll down under the "Video" tab to view the bitrate settings. You will see that the maximum bitrate is set higher for Vimeo, it is at 20 mbps, where as YouTube's maximum preset is set at 16mbps. You will also notice under the "Audio" tab that Vimeo's Audio precedence is set at "Sample rate," while YouTube's precedence is at "Bitrate." I'm not sure why these differences exist, but I'll continue to do some research and let you know what I find.
Underneath the "Video" tab, follow these bitrate instructions:
(1) Update your “Target Bitrate” from 16 to 10 mbps and keep the “Maximum Bitrate” [Mbps] to 20 mbps. This will reduce the file size, but also keep the quality high.
(2) Also, change the Bitrate Encoding to "VBR, pass 2." Changing the bitrate encoding to "VBR, 2 pass" will produce a higher quality image, but it will take longer because the 1st pass analyzes which parts of the image can be compressed at a higher and lower bitrate and 2nd pass only compresses the video.
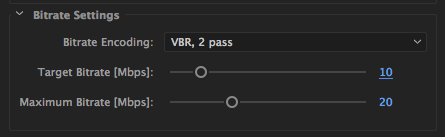
Best Bitrate settings for 1080p video to Vimeo.
If you want to export 4k video to Vimeo, first select the preset: "YouTube 2160 4k" preset and under the "Video" tab change the Bitrate settings to the following:

Best Bitrate settings for 4k video to Vimeo.
If you want further compression recommendations for 1080p or 4k video for Vimeo, you can follow Vimeo’s compression guidelines here.
You can also auto-publish your video to Vimeo under the “Publish” tab. Scroll down and check the box next to Vimeo and then click on “Log in” and it will open up a window to connect your Vimeo account to Premiere Pro. Just like YouTube, you will be able to select who can see or view the video, add tags and a description. I recommend keeping the "Viewable by" as "only me" until I I go to my Vimeo account and upload a custom thumbnail.

Adobe is working on a way for us to add a custom thumbnail to our uploads with the Social Publishing Beta. I can't wait to share soon!
Once you are done making these adjustments either hit "Queue" to launch AME (Adobe Media Encoder) to export or hit "export" and it will use Premiere Pro to export the video. Let me know if you have any questions!