New Captioning Workflow in Adobe Premiere Pro 2021 v. 15.0
Captions and Subtitles open up new possibilities for both editor and viewers alike. Videos can become more accessible, viewer friendly, and engaging. In addition to adding depth to your videos, captions can be used across multiple platforms which means more productivity and extra time to focus on your creative work. Now some may find the idea of creating captions daunting, though you’re in luck! Creating captions is actually very simple thanks to the new workflow that you will find within Premiere Pro 15.0
Pro Tip #1
Finish any existing projects before updating to Premiere Pro 15.0 By doing this, you will keep yourself from attempting to mix Premiere Pro versions; thus saving time and future headaches.
To Caption Or Not Caption?
Short answer: Yes! If you find yourself working within Social Media platforms such as Facebook, Instagram, or Tiktok, you can never go wrong with adding in captions; specifically burned in captions. These captions will be great for viewers who may need to watch a video without sound or to refrain from disturbing others nearby. By having captions on your video, any viewer is able to take in your video with ease. If you’re working with the YouTube platform, you’ll find that a closed caption will be more appropriate.

What is a Caption?
Captions are the text based translation of audio within a particular video.
A few common types of captions that you may hear about would be Open Captions and Closed Captions. The best way to remember the difference between the two is: Open Captions are fixed and typically burned into the video, whereas the closed caption can be “closed” or taken away from view. As stated previously, think of YouTube! YouTube videos use closed captions and your usual social media platform will have burned in open captions.
Below we have Premiere Gal on YouTube with Closed Captions:

Now that we know what they are, when’s the best time to create a caption?
The best time to create a caption is when you’re done creating your video. By waiting to add captions, you’re saving time because you don’t need to readjust or tweak captions based on new video edits in your video.
Creating Captions Step By Step
To begin creating your captions, you will click on “Caption” at the Top of the Premiere Pro screen. You will then see the text panel pop up on your left. Within the text panel you have a few options but for now we’ll focus on “Create New Caption Track”. This method is the manual method for creating captions.
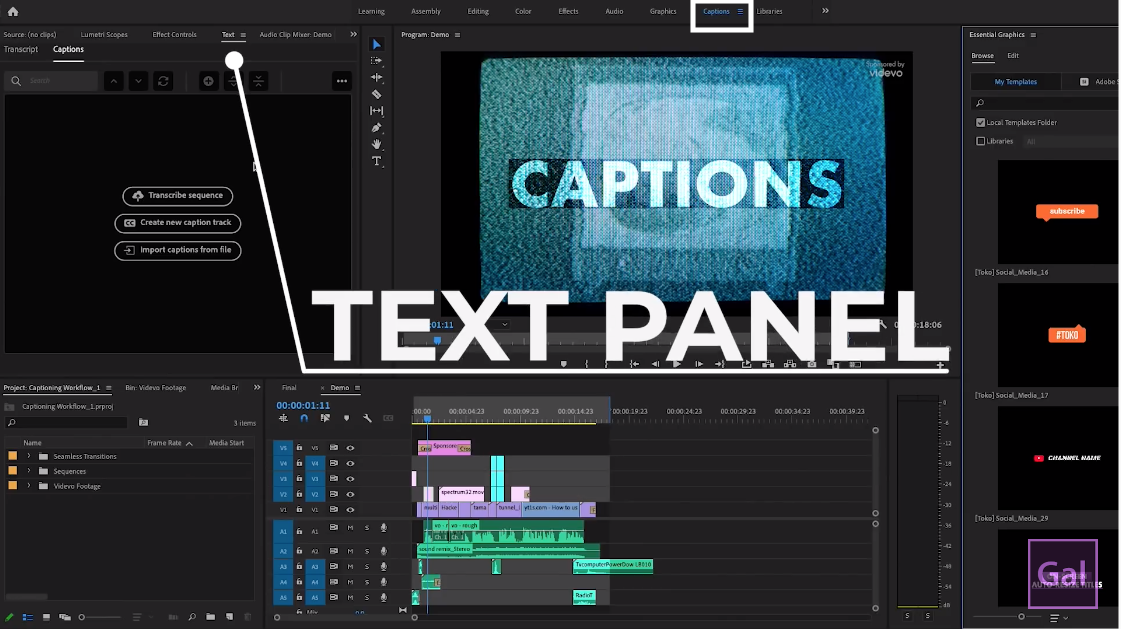
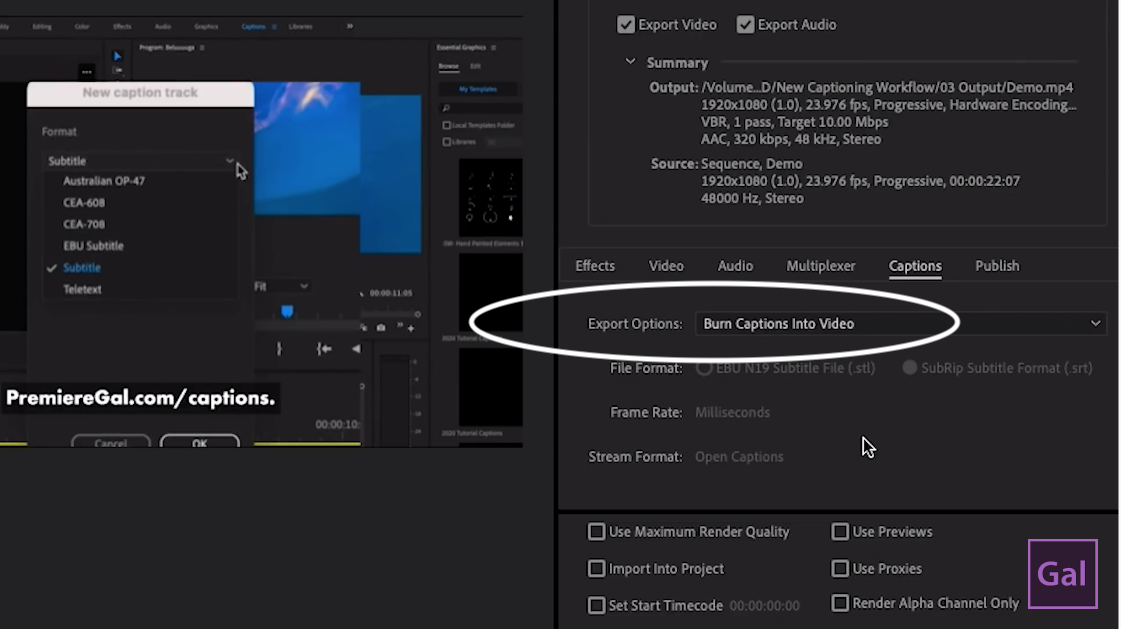
After you have clicked “Create New Caption Track”, a New Caption Track menu will pop up where you will select “Subtitle” from the format options. If you’re interested to learn about the other formats, feel free to Google them and explore.
Moving forward with the Subtitle format selected, click on the (+) symbol to create a new caption segment. Type in the dialogue manually and create additional segments as needed for the next captions. Once you begin creating your manual captions, take a peak below and you’ll see that the captions have their own dedicated track! This track makes adjusting your captions so easy as you can slide them just like you would slide video clips on your timeline. Note that as you’re adjusting captions on the caption track, the timings for your captions in the text panel are automatically updating as well. How cool is that?!

Once you’re done with your manually created captions and you decide that you want to save them as an .SRT file to use on your YouTube or Facebook video, click on the ellipsis and select “Export to SRT file”; it’s that simple!

Lifehack Alert! Timehack Alert!
* You can use Facebook to auto generate captions and then download them as an SRT file that you can then use within Premiere Pro.
If you recall, when we first looked at our caption options in the Text Panel, under “Create New Caption Track” was the “ Import Captions from file” option.
The Import option will certainly come into play when you have an SRT file ready to upload. Whether you generated the .SRT file via Facebook or by way of hiring a service to create your captions for you; Premiere Pro will be ready to receive your .SRT file.

Facebook Caption Creation Tips: Upload Video mp4 (without Captions) to Facebook > Captions Tab > Select Auto Generate Captions > Tweak the auto generated captions if needed > Click Download and voila!
Your .SRT file is ready for use!
Now you can hop back into Premiere Pro and click that third option as shown above, then choose “Subtitle” in the format pop up menu, followed by “Timeline Start” in the Start Point option area. As the timeline updates with your caption track and the Text Panel reflects your imported captions, double click on segments to edit or select all segments and simply drag the whole caption track to another area on your timeline if you need to realign the caption track.
Captioning In Style
Ready for some style fun? Always! When you’re done with your caption track, pop on over to the Essential Graphics panel and enjoy the ability to modify font, color, tracking, leading, and faux styles. Modifying and styling has never been so easy!

Premiere Pro has stepped it up once again when it comes to creative convenience! Instead of having to go back and update the style selection for every caption segment, you now have the ability to create preferred styles with their style text file capability. The preferred style is then applied to the entire caption track. Want to use the style again at a later time or share it with someone? You can! Simply go to the Project panel and right click on the style file, select Export Text File and share or retain the file for later use.

The Final Frontier: Exporting Captions
Now that you’re done with your captions and they’re looking mighty fine, the last step to take is export. You can export in a few different way: Export Captions as an .SRT file OR Export the video with captions burned in. To export as an .SRT file: Click Ellipsis in Text Panel > Click Export SRT File.
To export with Captions burned in video, follow same steps as exporting video (File > Export > Media) however you will want to be sure that on the captions tab, you select the option for “Burn Captions Into Video”, otherwise you will have a fine video - with invisible or missing captions; yikes! Lastly, navigate down to the bottom of your screen and hit Export!
Final Thoughts
Speech To Text, Transcription, Caption Updates, Style Files, Dedicated Caption Track.. We can all unanimously agree that these updates and innovative new capabilities have added some real excitement and momentum within the Caption world and Adobe Universe. For those of us still having flashbacks of creating each caption segment line by line..by line in Premiere Pro, we are beyond words and over the moon for every update that Adobe has made for Captions. As a current member of The Public Beta program, I can tell you that the Transcription feature is going to have you doing back flips throughout your studio as it will shave hours off of your dedicated caption time. If you’re not part of the Beta, I encourage you to learn more about joining as it is an amazing opportunity to get involved in testing new features and having your voice heard when it comes to perfecting future updates. If you find yourself saying, “this could be better if they only did ___” then you need to be in the Beta programs.
Until next time, stay safe and stay creative!